Chocolate Peanut Butter Baked Oatmeal

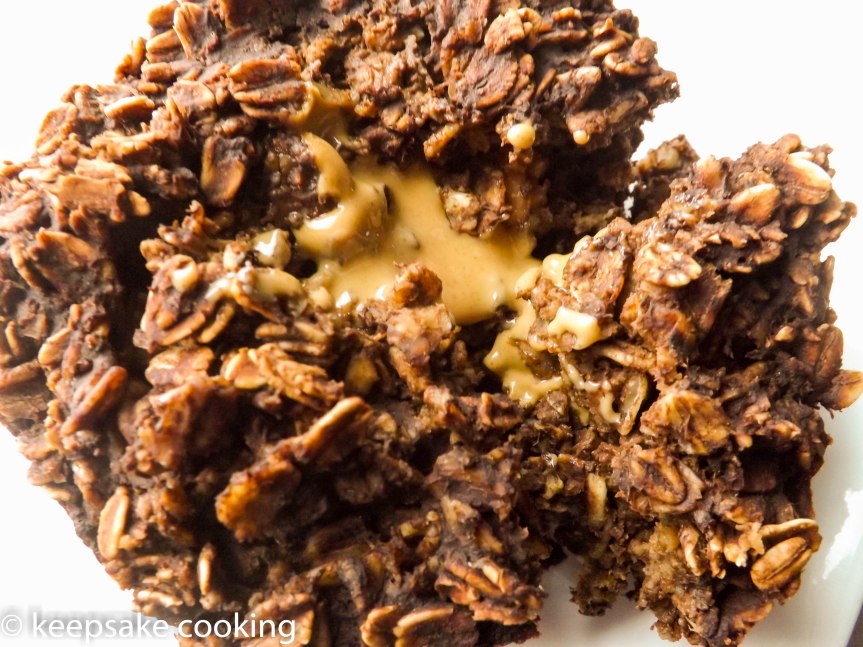
Chocolate. Peanut Butter. What can I say other than it’s one of the best food combinations on the face of the Earth?  Who wouldn’t want chocolate and peanut butter for breakfast?! I know I would love it. In fact, I DOOOO love it! This baked oatmeal is the texture of a giant oatmeal cookie combined with chocolatey goodness and ooey gooey peanut butter. It’s the bee’s knees.

double ramikin_1

When I first started on my weight loss journey, and battling fatty liver disease, I was pretty desperate for something that I felt was “normal” food. I was so addicted to sugar and heavily processed foods that that was what I thought and believed food should taste like all of the time. However, I also knew that if I continued to only eat yogurt and berries for breakfast (there is nothing wrong with them, but a gal can only eat so much yogurt and berries!), I’d quickly turn back to the heavily processed breakfast foods I had been used to eating. I was always hungry, and that was annoying. So, I scoured Pinterest, and came up with a lot of overnight oatmeal recipes, egg recipes, and recipes loaded with cheese or sugar. Admittedly, breakfast was my hardest meal to plan for (okay, I’m not kidding anybody. It’s still my hardest meal to plan for) because I don’t like the taste of eggs much, hate the texture of regular oatmeal, and have to limit my dairy (also part of why I couldn’t eat yogurt and berries forever), sugar, and greasy/fatty foods. Then I found the original recipe for this baked oatmeal on a blog called Southern In Law and was hopeful. This baked oatmeal fit my criteria very nicely; it didn’t call for sugar, dairy, and wasn’t a heavy fatty meal, but still filling. And, it was chocolate (which I craved!!) and peanut butter (which I seriously could smear all over a shoe and eat it I love it so much). I was so excited!

close up ramikin

Since then, I’ve tweaked it a bit (only a tiny bit!) to suit my tastes. The slightly amended recipe is what is below. But, I must give credit where credit is due, and let you know that you can find the delicious original recipe here. PS- take a look at her recipes! If you’re looking for some fun options that are healthy, delicious, and creative, Southern In Law’s blog is a great place to start.

PB close up

I’ll also let you know that if you’re not used to eating chocolate without a lot of sugar added, then the recipe as I have it on here (and the original) will probably taste bitter to you. When I first started eating it, I would add not only Stevia but also loads of honey. I eventually weaned myself off of the honey on my baked oatmeal, but have kept the Stevia for a tiny bit of sweetness. It’s gentle on my stomach, and keeps me super full until my next meal or snack. Depending on the morning I’ll eat only half of it with some extra food, while other mornings it’s pretty much just the baked oatmeal. Some mornings I like to eat half of it with some Canadian bacon and a handful of berries (strawberries are my favorite with this!). Whether you eat half of it with some fruits and breakfast meats or just the baked oatmeal on its own, it’ll keep you satisfied!


Chocolate Peanut Butter Baked Oatmeal

Inspired by the original recipe from Southern In Law

Makes 2 servings (10 oz. ramekins)

Ingredients

1 c old fashioned oats

½ tsp baking soda

Pinch of salt

2 heaping Tbsp cocoa powder

1 packet of Stevia

4 Tbsp unsweetened applesauce

3 tsp vanilla

½ c almond milk

2 heaping Tbsp peanut butter (I prefer processed peanut butter to natural because it holds up better)

Directions:

  1. Preheat oven to 350° F. Prepare 2 ramekins by spraying them inside with non-stick cooking spray.
  2. Combine the dry ingredients in a medium mixing bowl.
  3. Add the applesauce, vanilla, and almond milk to the dry ingredients. Mix well until all ingredients are fully combined and the oats are covered by a chocolately sauce.
  4. You’ll need to somewhat evenly divide the batter into 4. They don’t have to be perfectly even, but you’ll need to put roughly a quarter into the bottom of each ramekin to cover the bottom and provide the peanut butter a space to sit. Go ahead and put a quarter of the oatmeal batter on the bottom of each ramekin. Set the remaining batter aside for a short while.
  5. Add a heaping tablespoon of peanut butter to each ramekin; you can kind of spread it on top of the chocolatey bottom if you wish…I prefer to leave it in a lump in the middle so that it gets really gooey when it comes out of the oven.
  6. Cover the peanut butter with half of the remaining oatmeal batter, and put the ramekins in the oven for 20 minutes*.
  7. When done, the middle might look a little wet still, but that’s okay. The chocolate should be brown, not black (if it’s black, then the chocolate was overcooked!), though a few smidges of black here and there are to be expected. Let it sit for a few minutes to set up before eating.
  8. Enjoy that morning, or store in the refrigerator. These oatmeals reheat nicely in the microwave, making them a great quick breakfast the next day.

*Time is based on ramekins that I have. The original recipe said anywhere from 20-40 minutes. I use these snazzy 10 oz. ramekins from Rachael Ray.

Please note that these are not paid or sponsored advertising for Southern-In-Law, Stevia, Target, or Rachael Ray. These are just my opinions, and my showing you what I use to cook the baked oatmeal.

Learning a New Normal

I know, I know, I haven’t posted in like 6 months. I’ve been wanting to write about everything food related, but I’ve been struggling with learning a new normal. In September 2015, I was diagnosed with Non-alcoholic Fatty Liver Disease. Most people who have NAFLD don’t realize they even have it; sadly it’s more common than people realize. However, my body showed symptoms- pain in my upper right side (just under my ribs), and constant sick feeling in my stomach- and luckily, my doctors were able to catch things before they got much worse.

The diagnosis, though, changed everything about how I ate and what I ate. Changed it so drastically, that I seriously had no idea what to do. I had to cut out refined sugars, completely, so there went my pop addiction. I had to cut out refined flours, somewhat and go gluten free when I can. And any deep fried, heavy comfort foods? Forget it! Not allowed. UGH!! I cried. Everything was happening so fast, and I was overwhelmed, frustrated, and angry. I felt not only like I didn’t have anything to eat (because let’s face it, I ate like a garbage disposal and was now required to eat healthy food), but I also felt as if everything I loved to eat hurt me.

So, since September, I’ve struggled to find a new normal with food. I had to go from the diet of an unsupervised child in a candy factory, to one more clean and health conscious. I worried (and still worry) that if I falter to often I will cause more damage. Changing everything I know made it hard to figure out what to write about on a blog about food. But…I think I am finally ready to share my stories and experiences about this new chapter in my life.

Since I started changing my eating habits, I’ve explored new foods (mainly veggies) I never would have thought to try before. And, on the plus side, I’ve also lost nearly 50 pounds! The last 5 months have been tough, filled with many missteps, but I feel so much better. The healthier options give me more energy, and the pains in my right side are gone. I no longer feel so sick and weak. I feel stronger. I like stronger; I like how it feels. 🙂 And, I am excited to share stronger and healthier with you.

Strawberry Freezer Jam

Every summer when my brother and I were kids, we would go to the lower peninsula of Michigan to visit our grandparents. From where we lived in the UP to my grandparents’ house, it was easily an 8 or 9 hour car ride, but the thought of all of the fun things we could do without our parents around (hehehe) made the journey worth every second.

My dad’s parents moved to the LP of Michigan from Indiana when I was quite little, and my brother and I would go there every summer to visit them, my aunt, uncle, and cousin. Some of the coolest memories I have are from our visits there. Cake decorating, basket weaving, rock hunting, watching fireworks from the bow of a boat in the middle of Lake Michigan…and so many more. One of my other favorite parts of going downstate was the food. My parents are lovely cooks, but my grandma and grandpa had them beat (sorry mom and dad!!).

muffinandstrawberry

My grandma had strawberry freezer jam on her table at nearly every breakfast. When it wasn’t out, my brother and I would ask for it. I loved the cool sweet strawberry jam smeared on hot sourdough toast (homemade bread is like my 3rd best friend, only to be out done by cookies and ice cream; and I need to say, grandpa’s homemade sourdough bread was the best…ever). The mornings after the longest car ride were always awesome because we knew we would get to sit around the table, chat, and eat toast with strawberry freezer jam, and bacon or sausage. Always.

breakfastondeck

This is my first attempt at making freezer jam on my own. The jam was always already done by the time my brother and I got there, so I never got to see her make it. I was always intimidated by anything that required a glass jar and pectin, and this was no exception. But, as you can see, it turned out beautifully.

handmodelforjam2

jammycloseup

strawberryjamjartop

I am, and have always been, surprised at how bright red the jam is when compared to store bought jams. There’s no food coloring. It’s just one of nature’s brightest red fruits workin’ its magic. The other thing is that it tastes SO much better than the stuff you buy in the store. It’s like being able to taste summer all year long.

strawberryjamjar1

strawberryjamjar2

jamgrouppic2

I realize, too, that I posted this way later than I wanted and strawberries are most likely not in season at this point in August. But, that’s not going to stop me from posting it. Also, I decided to include a variation for raspberry freezer jam since raspberries are still on in August. The plan before fall is to make some blackberry jam, and applesauce!

*Note: When buying pectin, be sure to check that it is compatible with freezer jam methods. Some pectins are for cooked jams and jellies only, and won’t set when used in freezer jams. Also know that freezer jam is a little runnier than cooked jam/jelly, and since it’s not cooked, it cannot sit out on the counter top. It needs to be refrigerated.
**Double Note: Make sure you measure everything EXACTLY in this recipe. Failure to do so will result in a jam that will not set, and be much too runny.

Strawberry Freezer Jam
(Makes about 5 cups)

2 cups crushed strawberries (For reference, 1 quart is around 2 cups crushed. You will need to measure to be sure it’s exact).
4 cups granulated sugar (and yes, you will need all of it!)
1 box of pectin (I used Sure Jell)
¾ cup water

Directions:

1. Make sure your jars and lids are clean before using.
2. Measure out exactly 2 cups of crushed strawberries. Put into a large bowl.
3. Measure out exactly 4 cups of granulated sugar. Add all the sugar to the strawberries.
4. In a small sauce pan, combine the water and pectin. The pectin can look a bit lumpy when it’s in the water, but no worries! It won’t make lumpy jam.
5. Bring the water and pectin mixture to a boil on high heat, stirring constantly. Boil for 1 minute (I used my kitchen timer), stirring constantly, and remove from heat.
6. Quickly add the hot pectin water to the strawberry sugar mix. Stir for 3 minutes, or until the sugar is dissolved.
7. Fill your jars immediately, leaving about ½ inch of room for expansion while it freezes. Cover with the lids and let it sit at room temp for about 24 hours before putting it in the freezer.

Raspberry Freezer Jam
(Makes 7 cups)

3 cups crushed raspberries
5 ¼ cups granulated sugar
1 box of pectin
¾ cup water

Directions:

1. The steps are exactly the same as above, except you are measuring out 3 cups of crushed raspberries and 5 ¼ cups of sugar. The rest of the process is the same.

Pesto Chicken Sandwich

Sometimes a plain ole sandwich just doesn’t cut it. Don’t get me wrong, I like the convenience of a sandwich, but I am often left unsatisfied after eating them. This sandwich, though, will not leave you wanting. It’s filling and packed full of flavor. And, I’m pretty excited about it.
My sandwich muse was a toasted Italian sandwich with gobs of mozzarella cheese melted over salami and genoa ham. While this sandwich sounds amazing, it just couldn’t quite deliver. What I really wanted was a sandwich that I could bring on a picnic and wasn’t too greasy, but filling enough that I wasn’t going to be hungry later. Enter my sandwich brainchild—The Pesto Chicken Sandwich.

basilchicken1
Ok, so I’m not the first person to combine these ingredients, but I’m super proud of this creation. Plus, the word “brainchild” makes me feel like a mad scientist of sorts.

Filling, but not heavy, this sandwich was the perfect solution to my sandwich dilemma. Juicy chicken with homemade pesto and fresh grape tomatoes are a tasty alternative to the heavy sausage-type meats and loads of mozzarella cheese. Add a bit of real mayo and a chewy ciabatta roll, and you’ve got a sandwich that’s pretty dang tasty. Who am I kidding, it’s AMAZING! My favorite part is when you toast the ciabatta roll and the heat from it makes the mayo a bit melty, so when you bit into it, the mayonnaise and pesto combine to create this fresh yet rich sauce that surrounds the chicken and tomatoes in edible delightfulness. I don’t know how else to describe it, so I’m going to let you look at it.

basilchicken_closeup1

Look a little closer…

basilchicken_closeup2

A few notes before the recipe. Traditionally, pesto has pine nuts, but I used walnuts for two reasons. One, pine nuts are expensive and sometimes hard to find here. Two, I am pretty broke. I also like garlic, a lot, so I add more garlic in my pesto than is called for here. 😛 I salt and pepper my tomatoes before they go on the sandwich, but it’s not required. As for the parmesan, I bought the fancier kind you can find in your deli. It wasn’t the wedge of cheese, but already grated and just a bit more expensive than the stuff some folks use for spaghetti. And, finally, this bad boy is good both hot and cold, just don’t toast the bread too much if it’s going to be served cold otherwise you’ll have some very chewy ciabatta.

Pesto Chicken Sandwich

For the pesto (makes about half a cup, but you can increase the recipe to cover all 6 sandwiches if needed):
1 c fresh basil
Juice from 1 lemon
1 Tbsp minced garlic (and yeah, I use the jarred kind because I’m lazy)
2 Tbsp walnuts, lightly chopped
1 Tbsp good parmesan cheese, grated
3 Tbsp of Extra Virgin Olive Oil

Directions
1. Put the first 5 ingredients into a food processor. Pulse until kind of grainy, then add in the extra virgin olive oil. If you’re a pro, and can do it without making a mess, you can add in the EVOO as you are pulsing the other ingredients once they’ve broken down a bit (I’m not that good). Continue processing until the pesto is well combined and there are not any giant chunks of walnut left. It will look a little grainy still, but that’s okay.

For the sandwich (makes 6 sandwiches):
3 boneless skinless chicken breasts, cooked (pan seared or grilled work very well)
6 ciabatta rolls
30 (roughly) grape tomatoes (or really, 6 slices of a larger tomato will work)
Homemade pesto
Real mayonnaise (go full fat on this one)

Directions:
1. Split ciabatta rolls, if not already done for you, in half and lay flat. If you are serving this warm, toast the rolls after splitting them. If you are serving them cold, ignore the toasting step and move on.
2. As rolls are toasting, split your grape tomatoes in half length-wise. I like to try to cut the little spot where the vine used to be directly in half if I can. This way, minimal tomato juice is lost. You will need roughly 10 halves for each sandwich depending on how big your ciabatta rolls are. After I cut the tomatoes, I salt and pepper them lightly, but you don’t have to do this.
3. Slice your chicken breasts into strips. You will use about half a chicken breast for each sandwich.
4. On one half of the ciabatta roll, put as much mayo as you like. Once you have an amount you are happy with, place your chicken breast slices on the mayo. Set this half aside as you work on the other side.
5. On the other half of the ciabatta roll, spread your pesto. I like to try to get about as much pesto as I do mayo for a good balance. When you are done, add your grape tomato halves.
6. When the chicken and tomatoes are arranged how you like, place the two halves of your sandwich together. Eat and enjoy!

Oatmeal Raisin Cookies with Raisin Glaze

A few weeks ago, it was pretty cold for spring/summer and I was craving cookies. I’m going to warn you now that cookies are one of my top five fave foods, so be prepared to see several different types. I have an entire book of cookie recipes…ok, more than one book! I love them, and they are one of my favorite things to make and eat.

Oatmealcookie11_bakingrack_closeupOne type of cookie that always seemed to elude me was the oatmeal raisin cookie. Every time I made them, they were just disappointing. They would be too hard. They wouldn’t have enough cinnamon flavor. They were boring and made me sad. Cookies should never make you sad. Seriously, how can you be sad about cookies?! Oh, but I was. Then I met this oatmeal raisin recipe, and all my oatmeal cookie sorrows were swept away by cinnamon, pecans, and a raisin-y glaze that I can’t resist. Another plus to this recipe is that the cookie is so soft. It’s like a warm, spicy pillow of oatmeal raisin goodness. Who wouldn’t want to sleep on that?!

Oatmealcookie8_topview

The original recipe can be found here. After the first time I made these, I was in love. Of course, over time, I’ve tweaked the recipe a bit to better suit how I bake; feel free to do the same!

Oatmeal cookie3 Oatmeal Cookie_2_sideview Oatmealcookie9 Oatmealcookie12_sunshine


Oatmeal Raisin Cookies with Raisin Glaze
*Makes about 3 dozen*

For the Cookies:
1 c seedless raisins (cooked…see directions)
1 c water (for the raisins)
1 c vegetable shortening
1 ½ c dark brown sugar
3 eggs (slightly beaten)
1 tsp vanilla extract
2 c rolled oats
1 tsp baking soda
2 c all-purpose flour
2 tsp cinnamon
1 tsp salt
1 c pecans, chopped

For the glaze:
2 c powdered sugar
¼ c raisin water (see directions)

Directions for the cookies:
1. Get your raisins ready. In a small pot, add 1 cup of raisins to 1 cup of water. Heat until almost boiling (I’ve been too impatient to see what happens if I actually boil them!); using a slotted spoon or small colander, drain raisins and reserve all of the cooking liquid.
2. Preheat your oven to 375.
3. In a large bowl, or stand mixer bowl, cream shortening and sugar. Add eggs; mix until eggs are combined with shortening and sugar. Add 3 Tablespoons of raisin water and then add the vanilla extract. Mix. In another bowl, combine oats, baking soda, flour, cinnamon, and salt. Add to shortening and oat mixture. Stir to combine well. Once combined, add raisins and pecans.
4. Drop by measured Tablespoon onto parchment lined cookie sheets. Bake until edges are brown; about 10-12 minutes. Transfer to a cooling rack.

Directions for the glaze:
1. In a smaller bowl, whisk together the powdered sugar and the raisin water until smooth. You may need to add water, or not add all of it, depending on a few factors. I’ve made this recipe many times, but sometimes I don’t add all of the water and other times I need more.
2. The consistency should be thin enough to drizzle or spoon over the cookies, and not thick like frosting. It should stay on your spoon without much of it dripping off. If it’s too thin, then it’ll not stay on the cookie. Also consider putting additional parchment paper or wax paper under your cooling racks to avoid a large sugary glaze mess on your counter tops!
3. Let the cookies set a few minutes to allow glaze to harden a bit…if you can wait that long! 🙂


Raspberry Chicken with Raspberry and Walnut Spinach Salad

Hello there! I’m back! It’s been a hectic and crazy few months, but I’ve been doing some research and development in the kitchen. I have to say, I’m pretty excited about sharing my finds! First up is this amazing Raspberry grilled chicken with raspberry walnut spinach salad. This stuff is good. And, probably a lot healthier than one would expect from me. 😉

Rasperychicken_1   This meal was inspired by a grilled chicken and strawberry wrap I spied on Pinterest by the Pioneer Woman. I wanted to make the wrap, but I got distracted by all of the wrap flavors the grocery store had to offer, and ended up buying jalapeno wraps. Hmm…probably not the best choice for raspberry chicken, but it did add some delicious spiciness for a beef and bean burrito later that week. Anyway, back to this meal.
The chicken is marinated in the raspberry salad dressing, which makes it sweet and juicy. Cooking it on the grill causes the marinade to sweeten up a little bit more, but it’s not too sweet and sticky (not that sweet and sticky sauce is a bad thing!). Instead of adding rice or another starch, I opted to make this salad. Crisp, bright spinach paired with fresh raspberries and crunchy walnuts make it seem so gourmet, but it’s so easy! I couldn’t wait to eat the leftovers for lunch the next day!

Raspberrychicken_2

Raspberry chicken and Raspberry and walnut spinach salad:
3 or 4 chicken boneless skinless chicken breasts
Salt and pepper
1 bottle of Raspberry vinaigrette or Newman’s Own Raspberry Walnut salad dressing
1 large bunch of spinach
1 small bag of walnuts
1 pint of fresh raspberries
Salad fixins: I used Texas toast croutons, and French fried onions

1. Season the chicken with salt and pepper to taste. This seems a bit weird considering you’re going to put it in a marinade, but I can’t just not salt and pepper my chicken; it’s like my automatic first step when it comes to meat. Add the chicken to a gallon size freezer bag, and seal it. With a kitchen hammer, or rolling pin, or whatever hard thing you can find, pound out the chicken until it is pretty uniform in thickness. The more evenly thick the chicken, the more evenly it’ll cook on the grill.
2. Pour about 1/3 to ½ the bottle of salad dressing over the chicken. Seal, and put in the refrigerator for a minimum of 2 hours. I don’t know if I would leave it longer than 6 hours, only because I haven’t tested it out. 🙂  About 20 minutes before you want to take the chicken out, get your coals ready, if you have a charcoal grill. I always forget that I have to wait for the charcoal.
3. Put aluminum foil over your grill’s grate to prevent the marinade from the chicken from dripping onto the charcoal or flame, and creating a flare up. Using tongs, take the chicken out of the marinade, and place it on the aluminum foil on the grill. Discard the marinade and plastic bag.
4. As the chicken is cooking, get the salad ready. Rinse off the spinach and raspberries; let them drain either on paper towel or in a colander (if you’re lucky, you might have a salad spinner, in which case use that to dry off the spinach…and know that I’m a little jealous you have one).
5. Cook the chicken until the juices run clear and the meat is white all the way through. Let the chicken rest a couple minutes on a plate to allow the juices to redistribute around the meat before you cut into it (this makes it juicy).
6. Assemble your salad. Layer spinach, as many raspberries and walnuts as you want, and salad toppings. Use the vinaigrette or raspberry walnut salad dressing to dress the salad.
7. Serve and enjoy!

Chocolate Chip Cookies

Why is it that when I want to write about one of my favorite things, I seem to have a loss for words? I’ve sat here forever trying to think of something to say about cookies. How can’t I have anything to say about cookies?! They are literally the best thing ever. They are sweet, sassy, and full of goodness. They are also one of my favorite things to bake…and eat. I love that I can manipulate a few ingredients, and create something that is so delectable. There’s nothing quite like a fresh cookie hot out of the oven, especially if it’s a chocolate chip cookie. Melted chocolate oozing out of a soft buttery deliciousness, almost too hot to eat, but never impossible. The thought process as I bake usually goes like this, “Oops! I dropped one on my plate…well, it certainly can’t stay there. It needs to be eaten. Immediately.” The taste tester cookies have sacrificed their short sweet lives for the greater good. YUM.

cookie_closeup1

Unfortunately, one of the downsides to cookies is that you can’t eat them all in one sitting…ok, maybe you could, but I feel like you’d have a belly ache afterward. I had been on a mission for a long time to figure out how to keep all my hard work nice and chewy after a day or two. I mean, really, it’s kind of a disappointment to bite into a hard cookie the next day. I began a search for the perfect ingredients that would make even the butteriest of cookies soft and wonderful after a day or two of sitting in a container. I tried putting a slice of bread in the container with them, which works to a point. I tried adding more flour, which only made them dry. I tried under-baking them, which probably could’ve lead to food poisoning (luckily it never did). I was sure that I was destined to have hard next day cookies forever. Until…

It was by happy accident that I discovered this trick, and I decided I wanted to share it. One fine day, I wanted to make M&M cookies for a friend’s birthday. It was July, and HOT, and I refused to turn on the oven until it was closer to evening time when it would be much cooler. I put the cookie dough in the refrigerator, and let it sit for several hours. Later that night, I baked them as usual and stored them in a container. I was convinced that they’d be a bit hard the next day, but I knew my friend would still appreciate the gesture. The next day, I gave him the cookies and went about my day. Two days later, he text me, “Your cookies are still soft and chewy after two days! What did you do?” To be honest, I wasn’t sure, but I had a hunch. A few days later, I made another batch and retraced my steps exactly, including refrigerating the dough. Jackpot! Soft, chewy cookies again.

Every batch of cookies I bake I now refrigerate for at least two hours, if not overnight, to give the dough a break and to make them nearly as soft and wonderful as the day they were made. Since I usually follow the recipe’s steps to a “T,” I wouldn’t have ever thought of refrigerating the dough. Most cookie recipes don’t include that as a step.

Today’s cookies are your basic chocolate chip cookie recipe. The only variation is in the directions, where instead of spooning them onto pans and tossing them into the oven, you stop and refrigerate the dough. Since the dough will be hard to spoon, let it sit for a little while on the counter top and warm up enough to scoop. The chewy delightfulness that you’ll experience will be worth the wait!

cookie_plate1 cookie_stack1 cookie_twoplate cookiecup_stack1

Below is the recipe I usually use to make chocolate chip cookies, with my notes. If you want the original recipe, look at the back of a Hershey’s semi-sweet chocolate chip bag! 😉 (Seriously was trying to link to them, but their site’s being slow. Will update later).

Chocolate Chip Cookies (makes about 5 dozen cookies)

  • 2 1/4 c all-purpose flour
  • 1 tsp baking soda
  • 1/2 tsp salt
  • 1 c (2 sticks) butter, softened (I use unsalted butter to control my salt content)
  • 3/4 c granulated sugar
  • 3/4 c packed light brown sugar
  • 1 tsp vanilla extract
  • 2 eggs
  • 2 c semi-sweet chocolate chips
  1. Stir together flour, baking soda, and salt. Beat butter, granulated sugar, brown sugar, and vanilla in a large bowl with mixer until creamy. Add eggs (one at a time); beat well. Gradually add flour mixture, beating well. Stir in chocolate chips.
  2. Cover the dough with plastic wrap (you can leave it in the bowl), and refrigerate for about 2 hours (or longer). When ready to use, take the dough out beforehand and let it soften up enough for you to scoop.
  3. About 15 minutes before you are ready, preheat oven to 375.
  4. Drop cookies by rounded spoonfuls onto an ungreased baking sheet (I use parchment paper if I have it as it makes less of a mess and I don’t have to wash pans afterward).
  5. Bake 8 to 10 minutes or until lightly browned. Cool slightly; remove cookies from cookie sheet to wire rack. Let cool completely.

Enjoy! Until next time! ~Angela

Hunting for food photo props!

While scouring through different food blogs online, I came to the conclusion that all of the food bloggers in the world must have immaculate kitchens with amazing natural light. Thankfully, I know now that that notion is not true (although I’m sure these people don’t have ultra gross kitchens), and that much of the perfection I’ve witnessed in their photos is due to some awesome DIY skills and a little bit of trickery. Many of the food blogs use props to help their dishes look delicious…maybe a better way of saying this is that they use them to make their food look super irresistible! While I know props are not the only component to great photos, I think that using paper plates and plastic silverware probably won’t help me. This weekend I have been on the hunt for some quirky and fun photo props to use on the blog.

I don’t have a ton of money, so I decided that I was going to look at what I already have and make a list of what I can use, what I should save for, and what I should get right away. I discovered that I already own a great deal of cool things that I can use for props such as a tiny tasting set, ice cream bowls, bright scarves, and a variety of place mats. Unfortunately, I still need a few items such as silverware (unless my mom is cool with me using hers…hint, hint mom 😉 ), small plates, and backgrounds. Since it’s like 100 below zero here, I know that creating some super cute rustic backgrounds won’t be possible until it warms up. I’ve heard of some bloggers using scrapbook paper, of which I have a bunch, while others just use foam board or white paper. Until I can paint wood outside without it freezing on the brush, I think those ideas will work just fine.

Luckily, I also have a couple of secondhand shops available to me locally. I went to my local Goodwill on Saturday, and discovered a treasure trove of cool things! Coffee mugs, small bowls and plates, clear glass bowls, and vintage kitchen appliances (like a blender from the 80s…yeah, I guess 80s would be considered “vintage” in terms of kitchen technology, ugh.). There were some great finds, and it was hard for me to not go too crazy. However, I decided to hold off on buying until I could get to the other shop, which is a consignment shop. I have found some amazing antiques and beautiful kitchen gadgets there, so I want to hit up that store later this week. Maybe the choice to hold off will be a bad idea, but I’ve consistently found gorgeous things there. Keeping my fingers crossed!

Anywho, that’s what I’ve been up to the last couple of days. Until next time! ~Angela

Welcome to my humble blog!

This is my very first blog post. Ever. And, I’m a little nervous. I want this blog to be a space where I can share my adventures, both in the kitchen and in the big wide world. While it will primarily be a cooking/baking blog, I also think it’d be fun to go on field trips every now and again to see what other people are doing outside of the kitchen.

My goal is to create delightful meals and desserts from scratch, or mostly from scratch, as well as experimenting with a new technique or two along the way. I’m excited to get cookin’ and start my new blogging adventure!